Monday, August 25, 2014

DIY Herringbone Canvas Art

Woo! It has been SO SO long since my last post. Time to dust off the keyboard and get back at it.

During my not so brief intermission, I have had a lot of life changes. I went through a divorce, moved to a new home, switched my children's schools, took on a new job, and I am still alive to tell about it!

As a newly single mom in a newly rented home, I don't exactly have a ton of cash for decorating.  Of course, this isn't a problem if you are sufficiently able to start where you are and use what you have. In this case, I had several bottles of acrylic paint, some painter's tape, a can of white spray paint, and a couple of canvases.

The fuse box in my rental home is located on the dining room wall, and is quite the lovely eyesore.  I wanted to cover it without purchasing a large piece of art.  Here is what I did in the wee hours of a sleepless night.

I started out by dragging paint in vertical lines using dry paper towels as paintbrushes. Now, of course if you have brushes, go for it, but I made do with what I had available.


I personally chose to start with my lighter colors and move gradually darker. Then, I rubbed a thin layer of silver metallic paint over the entire canvas for dimension.

The next part is probably the most tedious part of the whole process.  I started by cutting about 8 billion 3 inch strips of blue painter's tape and affixed them over the acrylics in a herringbone pattern.  You are more than welcome to measure these out and make your spacing perfect, but you know what I always say.....perfection ruins a good project.


Once I had all of my tape in place, I selected a few strips to remove for an added flair.  Everything not covered in tape will become white in the next step, so make sure if you remove some pieces, you still are able to maintain the lovely pattern you just so painstakingly created.

Once I had my tape strips just as I wanted them, I headed outside to spray paint white over the entire surface of the canvas. Please make sure that when you perform this step you are outdoors in a well ventilated area.  Spray paint is no joke!

As soon as I had coated the entire canvas in white spray paint, I peeled away all of my tape strips.  You want to do this step while the paint is still fresh and wet.  If you wait for it to dry, the tape will peel the paint away with it.


Voila!  A finished work of art.  Now to repeat all of those steps for my second canvas.  Of course, you can do one, two, or even more of these in the color variation that best suits your decor and style.  Right now, my entire home is done in quite random colors.  The kitchen has vibrant shades of so many colors that just about anything would fit.  Use your best judgement on what colors to select.

Once I finished, I hung both canvases on my dining room wall.  Care to guess which is hiding that big ole mess of a fuse panel??


I'll give you a hint: It's the one on the left.  I think that later I'll probably go back and add some vinyl wording above the canvases or some other pieces just to add to the look, but I am pretty pleased with how this project turned out considering it was a spur of the moment, midnight project. 

How do yours look?  I bet you did an awesome job!

Thank you so much for bearing with me during my extended break.  As a reward...here is a picture of my little crazy man when he first woke up this morning.  Imagine how fun this was to tame before school!


Happy crafting, and stay tuned. I'll be posting again soon....promise!


Thursday, January 2, 2014

Stereo Cabinet Refinish

I naturally have a love for all things crafty, but as a mom I also have a love for all things thrifty.  I have been wanting desperately to refinish an older piece of furniture.  The problem...the only older pieces of furniture I already own are family heirlooms that I wouldn't sand or paint to save my life.  I couldn't bear the thought of sanding my grandmother's furniture.  If you have looked around for older furniture pieces, you know that people often ask way more than a piece is truly worth just because they can tag it with the word "antique" or "retro."  This drives me bonkers, but in a world where re-purposing is trending, what is a girl to do?  After a few days of scouring local yard sale pages I finally found an inexpensive piece that I fell in love with.

Sure, it didn't look like much, but for some reason this piece gave me vision.  I was immediately drawn to the geometric design of the cutouts around what used to be the speaker vents.  I just knew that I could give this piece a little love and new life.  When I picked the piece up, the furniture dealer who had posted the piece gave me a little background story on the cabinet.  Apparently the girl who had sold it had been given the piece by her father.  He had converted the top areas into a drawer and a cabinet and put the plaid inserts into the speaker vents in the early 80s for her to use the piece as a tv stand and have storage. Her father had told her at the time that she would have to live with the piece forever because of how much work he put into converting it for her.  I don't know why she got rid of the piece, but I was happy to carry on her father's "make it do" spirit.


The first thing you want to do when refinishing any piece of furniture is to go in and remove any hardware you don't want painted and in this case, any fabric panels that need removing and replacing.  You will see in later pictures that I left the hardware on the front of the piece attached.  While I would like to claim that this was a purposeful design choice, the fact is that the handles are attached with specialized furniture screws I don't have tools for.


The next step for any refinish project is of course to wipe down any debris from the piece and sand it down.  If  I were wanting to stain this piece a different shade, I would have needed to sand it down to the bare wood all over.  Since I was going to paint over it and distress it, I took the topper down to the bare wood grain, but just gave the rest of the piece a good sanding to remove the shiny finish so that the paint would stick. For this step, you want to use a coarse grain sandpaper or sanding block.  If you shop at a certain blue home improvement store, the sandpaper is sorted into strip, smooth, and finish.  You want to select a block from the strip section.  This is what the top of the cabinet looked like when I got it down to the bare wood.


Sanding can be a lot of hard work, but the fun part is coming.  For the paint color, I selected "Betsy Ross House" by Valspar.  I purchase the paint plus primer version in an interior semi-gloss.  The color is a very bright turquoise that leans more toward blue.  For this project I could have gotten away with a single quart and had some leftover, but I got two quarts just in case I needed to repaint the whole piece or in case I wanted to paint anything else to match later.  Better safe than sorry.

I popped my paint open and went to town, making sure I got down into each little cutout.  Design tip: if you are planning to distress a piece and want to do less distressing work, don't saturate your brush with paint in the same way you would to paint say a wall.  Using less paint on your brush will allow brush strokes to shine through and automatically give it that worn look.  I just painted over the hardware and am actually happy with the way that turned out.  If you don't want painted hardware, just remove it or tape over it before you start painting.


While I waited for the paint to dry so that I could distress the piece, I went ahead and recovered the fabric panels.  The fabric on these was TERRIBLE.  It was a really awful brown plaid upholstery fabric.  Think the most horrible late 70s couch EVER.  So what did I do?  I replaced it with the most horrible, putrid gold polyester suit fabric that was handed down to me from my great grandmother.  I have no idea what drew me to this fabric, but for the project at hand it just felt right.  At this point I was sending nervous text messages to my friends asking if it sounded like I was maybe losing my mind for choosing this fabric.

At any rate, I just popped the staples out to remove the old fabric.  Then I place the wood panels on top of the new fabric I selected and cut the fabric leaving enough margin to wrap it to the back of the panels and staple in place.


Once I had the fabric cut out, I stapled it all into place around the back of the panels making sure to tuck in the corners.  For this step you want to take note of how thick your plywood panels are as opposed to how long your staple legs are.  I would really hate for someone to do this project and staple wood panels down to their floors. (Not that I did that...ok I did, but the floors are vinyl plank, so the holes closed back up)


Once I had finished recovering the panels and the paint dried on the cabinet, I went back in with a fine grain sandpaper block to distress it a bit.  I don't usually like things to look super distressed, so the picture here is about the most distressed spot on the whole cabinet.  For this step you want to use a sanding block with a fine grain that is from the finish section of the sandpaper aisle.  Please excuse the little peep of finger in the bottom right corner.


Once I distressed the cabinet to the desired level, I reinstalled the fabric panels.  Then I stepped back to admire my handy work.


 At the end of the day, I am SO happy that I chose the fabric that I did.  I love the way the putrid gold polyester pops against the Betsy Ross House blue.  I can't say for certain, but I think the girl's dad would be happy to see the piece brought back to life to be loved for many more years.

Here is a before and after shot so that you get the whole effect.


Have you tried any restoration projects of your own?  Comment and let me know about it.

Happy Crafting

Tuesday, October 1, 2013

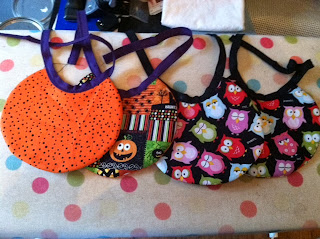
Quick and Easy to Sew Tie Closure Bib Tutorial.

Sewing thick, absorbent bibs for your baby is actually a lot simpler than you may think.  I have made bibs several different ways, but this is the quick and easy way.
 
 
Here's what you'll need:
Fusible fleece
Fabric of your choice for the front
Fabric of your choice for the back
Double Fold Bias Tape in coordinating color (about a 24 inch length)
 
And of course a sewing machine, thread, pins, an iron...basic sewing tools.
 
A note on the fabric, the size you need will vary based on what size bib you use as a template, but a 10x10 square should pretty much cover all of your needs.
 
 
Here's what you do:
 
Pick out a bib that you already have in the house (or just draw a circle and cut a notch out) and trace it onto the rough side of your fusible fleece.  Then cut it out.
 
 
Set your iron to a setting that does not steam.  This is important for the fusible fleece sticking correctly.

 
Lay your fleece cutout rough side up, line your front of the bib fabric up on top of it right side up and iron according to fleece directions. 

 
This is what the back looks like.  Basically you just fused the bib to the wrong side of your fabric so that it will act as a lining for your bib.

 
Cut around the fleece template leaving a 1/4" allowance around all edges for sewing.

 
Sew the right side of your front fabric to the right side of your back of the bib fabric square, leaving the neck notch open for turning.  We'll close it up later.

 
It will now look like this.


Cut off the excess fabric all the way around to make the fabric ends even.  Also, make little notches all the way around about every inch to make the curves pretty when you turn it out.

 
Turn it right sides out.

 
Pin your bias tape to the bib neck.  You can do this the right way or you can do this the cheater way.
 
 
Sew the bias tape in place, making sure to fold your ends under as shown.


Trim your strings and you have an adorable bib for your little one!  If you used two different fabrics, it is also reversible.


Great job!  I hope you enjoyed this project as much as I did.  Post pics if you make some for your little one.


Monday, September 30, 2013

No Spend Month Week 3

Wow!  We have made it past the halfway mark.  We were under budget the first week and over budget the second week.  Let's see if we can level it out.  This week, I planned for us to be able to use 30% of our $350 month long budget.  I figure by the end of this week, we will be running out of some household items.  That means we planned to have $105 to spend this week.  Because we went $54 over last week due to some refueling, I really want us to come in at $51 or less this week to make up the difference, but even if we just make up some of the slack, it will be ok.

Day 1: Feeling like I am ready to take on the world.  I got sad about overspending last week, but now I am made about overspending  last week.  I am determined NOT to spend anything over this week.  Whatever it takes!

For breakfast we did cereal.  I really did offer to cook, but everyone was starving and didn't want to wait for food.

Lunch consisted of sandwiches. (Tuna, PBJ, Cheese, whatever everyone wanted)

I had a business event at supper time, but my fabulous hubby prepared some jambalaya for the family.  He is so wonderful.

Day 2: SSOOO sleepy, but feel like it should be a good week.

Toast and jelly for breakfast, then just a boring day at the house.

Fixed some hamburger helper for lunch.

Monday's are soccer practice, so we ended up doing grilled cheese sandwiches for supper.  Mondays are just hard to pull together with soccer going on.  Not that anyone really minds eating grilled cheese.

I had some business related errands to run, then came home to make cute Indian corn snacks for Laney's class.  I had popcorn and treat bags already in the house, but I had to pick up Reese's pieces for $4.74 and green crepe paper streamer for $.97.  We also had to have another $4.09 gallon of milk. 

Day 3: School picture day!  School snack day!  Had to get up early and make sure I was on top of things.

Breakfast was cereal all around, then I had to get the babies dressed and get us all to the school to drop off Laney's class snacks.  I was going to run get the oil changed, but by the time we got there it was pouring rain and packed out.  No way I was getting babies out in pouring rain to sit in the waiting area for an hour.

We did "homemade lunchables" for lunch.  Cheese and crackers...and a handful of carrots.

Supper was chili.  I know it is still hot here, but I just really needed some fall food.  Chili is an easy and yummy solution.

After supper, I was working on some sewing projects to busy my mind, but Hubby and I were having INSANE caffeine withdrawals.  I grabbed us each a soda :(  $2.58 total.

So far this week, we have spent $12.38.  Not so bad, considering I had to throw in Laney's class snack and we had a soda meltdown.  I'll post a how to for the class snacks later.  They turned out super cute.

Day 4:  I'm really pumped about some of my planned sewing projects....AND that we only have a week and a half left of no spend month.  It hasn't been as awful as I thought it would be if we can just hang in there.

For breakfast, I whipped up some cheesy grits.  Cheesy grits have to be my favorite.

For lunch, we had some broccoli and cauliflower in cheese sauce that I have stored in the freezer.  My kids actually do love this.

Mid afternoon I rubbed down a whole chicken with some spices and roasted it.  When it cooled I broke it down and shredded it to use for Day 4 supper as well as supper another night.

Supper was another of my favorites....chicken and yellow rice.  Can never go wrong with this at my house.  I also made some field peas to go along with it.

Day 5: My oldest decided it would be a fabulous day to miss the bus, so we were up and scrambling to get her to school on time this morning. Rough way to start the day, but we pulled it together.

Breakfast was fruit in the car!  We really were in a hurry!

We had to run get some milk from the store, so I picked up other things we needed as well.  We ended up with milk, cheese, snacks (you can't have toddlers without cheesy crackers and graham cookies of some sort), pullups, and diapers.  If you are a parent, you know how expensive pullups and diapers can get.  We ended up spending a total of $39.43, bringing the weekly total to $51.81.

For lunch we did leftover chicken and yellow rice and peas.

For supper, we enjoyed a FREE pizza from Domino's.  Apparently if they harassed your cell phone several years back, they owe you a free pizza....check it out.

Day 6:  Breakfast was completely skipped today!  My little boy, bless his pea picking little heart, flooded half of the house and I spent the majority of the morning cleaning it up.  For those that don't know him...this is the third flood we have experienced....it is kind of his MO.

For lunch we ate some hot dogs and fruit.  Nothing fancy, but it gets the job done.

Hubby had to stop and pick up dog food, so that knocked us back another $18.  Hopefully that will be the last thing we have to spend this week.  Fingers crossed.

For supper, hubby put together some jambalaya for he and the kids while I took care of some things for my business.

Day 7:  ARE WE THERE YET?!?!?!  I can't believe that we have a week and one day left to go!  Today has been the busiest day in the history of the universe.  5k, soccer game, business event, wedding, and a million miles in between.  I am exhausted!

Whipped up breakfast for the family as I dashed out the door to go do my first ever 5k!  After the 5k I rushed home to shower and change.

Made the kids sandwiches for lunch before dashing out the door again for my business event this afternoon.  Had a blast, but dipped out early to head to the wedding of a friend around an hour away.

PHEW! What a LONG week!

Can't wait to start our fourth and final no spend week.

Indian Corn September Classroom Snack

My oldest daughter's classroom is doing a snack rotation this year.  We haven't done that since kindergarten, and I am excited.  Classroom snack gives me a chance to get creative for every month of the year.  Late September doesn't exactly offer a wealth of inspiration, but I finally settled on Indian Corn.

As I was preparing the snacks, she came in and said, "Mommy, all of the other moms in my class just buy junk for us and don't even care if we like it or  not. I'm glad you make things cute for us."  That, to me, makes any amount of effort that went into these totally worth it.

I knew I wanted to use popcorn for this project, but had trouble deciding how to prepare it.  I looked at several popcorn mix and caramel corn recipes. In the end, I decided that if I were a teacher I wouldn't want all that sticky everywhere.  I grabbed some Reese's pieces instead.  They ended up making the perfect fall colors for this.

What you'll need:
clear cellophane treat bags (or snack size bags if you feel brave)
green crepe paper streamer
rubber bands (or raffia)
popcorn (you can get 4-5 out of a bag of popcorn)
Reese's pieces (a family size bag worked perfect for 24)

Pop all of your popcorn and put it all in a gigantic bowl (I hate the butter on the back of the hand dilemma).  Open the rest of your supplies up to get them all ready.

You will also want to measure out lengths of streamer based on how big your bags are.  I cut two 24" pieces for each treat bag.  I also cut some additional pieces, cutting those into four long skinny pieces to tie off the tops.

Place two to three heaping handfuls of popcorn into a treat bag, then add a handful of Reese's pieces and shake.  Twist tie the bag shut with the tie provided.  Pinch the bottom corners together, roll up with the streamers, and secure with rubber band or raffia.  I had rubber bands on hand, so I skipped buying raffia.  I think it would be super cute though.  Bring the streamer ends up together in the top center so that it looks like corn husks. Then secure them with the smaller pieces of streamer you cut. (or raffia if you have it)

 
I will admit...the first two of these I made, I was ready to just roll down to the store and buy some junk and not care if they liked it or not.  After that I got a better grip on it. 
 
24 of these babies later, I felt super accomplished and had an adorable September snack for my daughter's class.  I also brought some apple juice boxes to go along with these.

She thanked me not once, but three times when she got home for how awesome these were.  I can't wait to plan and deliver next month's snack.

Sunday, September 22, 2013

No Spend Month: Week 2

This week, our budget is a very generous $87.50.  That accounts for 25% of our overall budget of $350 for the month.  Keep in mind, this includes gas and groceries.  Bills are not included in the no spend.  I know that $350 seems like a lot of money, but it goes quick with a family of 5. 

Day 1: It's a beautiful morning.  I am still pumped about having $4.09 leftover last week, so I am looking forward to this week for sure.

I had planned on making these awesome Pioneer Woman French Breakfast Puffs for breakfast, but the kids wanted graham crackers and carrots, so that is what they got.  Sometimes I just don't understand these creatures children.

I got a jump start on supper by tossing a Perfect Pot Roast into the crock pot before getting the kids dressed for church.

For lunch we kept it simple by throwing together some awesome grilled cheese sandwiches.  My mother in law bought me a grilled cheese press for Christmas.  Most people would be upset to receive an appliance, but she knows that I LOVE kitchen gadgets and appliances.  I love that she knows me so well.

Just before supper time, I tossed some rice in to cook and serve with the roast.  Mmmmm, the house smelled so good by this point that we were all starving.  To make sure we had enough for leftovers, I actually pulled out half of the meal before I served it.  You would be amazed at the difference in the amount your family eats based on availability.  We have a tendency to keep eating after we get full because we enjoy the taste.  By pulling out half, everyone still gets full, but you have food left for the next day.

Day 2: Morning got off to a pretty good start.

Breakfast was cheesy grits...these are a favorite across the board.

I was able to use up some fabric I have had around for a while today by making an apron for myself and cutting pattern pieces for several other projects to work on soon.

Lunch was the other box of organic mac n cheese that I had picked up for super cheap a couple weeks ago.

This afternoon, I ran Laney to soccer.  I also had to stop and pick up milk.  Our first money out for the week.  Can you believe it was $4.09 this week?!?! What is it with that number? That means that with tax I spent $4.38 on milk this week already.  Unbelievable. 

At supper we had leftover Perfect Pot Roast....which is even more yummy the second day, by the way.

Sorry my post is sort of short and sweet today....it was kind of a rough day.  There's always tomorrow!

Day 3: Woke up determined to have a better day than Monday, but I didn't really feel well.  I got some chores done early on and got to work on a few sewing projects.

Breakfast was cereal.  I had planned on scrambled eggs, but the kiddos had other plans.

Lunch was PB&J and popcorn. I make our jelly homemade...there is nothing like it.  You have to try it if you ever get a chance.

Supper was bean tostados.  This is one of our favorite cheap meals.  You just throw flour tortillas into jumbo muffin tins, fill them with refried beans, and bake at 350 until the edges of the tortillas turn golden brown.  Then top with whatever you like...cheese, salsa, tomato, lettuce, sour cream, etc.

After supper, I started work on next week's menu.  Oofta, I hope I can get the ingredients we need and stay under budget!

Day 4: Still didn't feel fabulous when I got up.  I had to just suck it up though.  I had a ton to do today to prepare for an event for my home based business.

The kids convinced me to give them cereal for breakfast again today.  I'm starting to wonder about my cooking.....

For lunch I threw together some jambalaya rice.  I can't tell you how much they love that stuff.

I tried to get some more work done on my sewing during nap time.  I know you have to be getting curious by now about what I could possibly be spending so much time sewing.  You will have to wait to find out.

For supper I made a chicken and broccoli ring on my favorite piece of stoneware.  The kids and I love broccoli, but hubby is not a fan.  Overall though, it went over well.

I am so excited that tomorrow is payday and that I have a personal business event.  I need a pick me up.  Going on two weeks with no Monster coffee, and the no spending has gotten to me a little this week.  Almost at the end of week two, and I am starting to feel like some of my wants are really needs, haha.  I NEED fancy coffee creamer, right?  Ok, maybe not.  At any rate, I am in deep need of some time out of the house and a reminder that this month is going to be worth it.

Day 5: Getting kind of bogged down, but hoping for a great day.

Breakfast was scrambled eggs and lunch was sandwiches, nothing exciting to speak of.

At supper time, I had a business event to attend, but the family had leftover chicken and broccoli ring.

Day 6: Toast and jelly and out the door to run errands...no time to gather my morning thoughts, haha. 

Bank, grocery store, gas station this morning with the kiddos.  We spend $37.42 at the store, then put $41 in the gas tank.  That with the $4.09 from earlier in the week would have put us at $82.51 and well under budget, but hubby called and said he found a great deal on gas that he couldn't pass up.  He put $59 of gas into his truck, so we are officially $54.01 over budget.

That would be getting me super down, but my fabulous mother and stepdad bought my my yearly supply of pumpkin spice coffee, so that softens the blow A LOT.

I had a business event around dinner time, so hubby rounded up any remaining leftovers for the kiddos and himself.

Day 7: Just kind of coasted through the day.  Feeling pretty awful about going over budget, but I know it means we will keep under budget the next week.

Hey!  We made it halfway!!!!

How are you doing with your no spend month?

Sunday, September 15, 2013

No Spend Month....the first week.


Our goal starting this week is for the whole family to spend $70 or less, which is about 20% of our month long budget.  Hubby got a $50 allowance for the week.  I got the remaining $20. Wish us luck.  Here we go!

Day 1:  I woke up this morning with that awesome feeling that comes with every new adventure.  That unwarranted pride and false sense of hope.  It is just like the first day on an awesome new diet that you just know is going to work. 

For breakfast, we all had leftover cupcakes (I know, mother of the year).

Lunch and supper consisted of leftover party food.  (get ready to hear that a few more times)

Day 2:  Still feeling unwarranted accomplishment.  Energized and ready to do this!

For breakfast, the kids had scrambled eggs and fresh strawberries left from the monster party.  Eggs are always an awesome cheap/free option at our house because we own our own chickens.  Eggs are always just a chicken coop away.


I had a cup of coffee and a little fresh fruit.

I had to run a couple of errands today, but I stayed as close to home as possible to keep my gas consumption down.  I had to run to my daughter's school, the pharmacy, and the grocery store.  Of course, the grocery store means I had to spend a little of our budget.  Luckily all we needed was milk.  Unluckily, the milk cost $4, bringing us down to $66 left for the week, $16 left for me.  Technically, the milk was $4.28 after tax, but I had change rolling around in my wallet to cover the tax.  Is that cheating?

Side Note: I spoke to my friend in California today....apparently their milk only costs $2...super jealous.  I guess California really is where happy cows live.

For lunch, the kids grabbed some meat, cheese, crackers, and carrots while I had some carrots and celery and a turkey wrap.

Had to burn a teeny bit more gas bringing the star athlete to soccer practice.

Supper consisted of leftover croissant sandwiches from the birthday party with veggies, chips, and fruit as sides and cupcakes for dessert.

Day 3: Still feeling pretty great about our decision to have no spend month.  I know this feeling will be traded for misery and panic in a few weeks, but I'm enjoying it now.

Kids had cereal and fruit for breakfast while I had fruit and...you guessed it...coffee.

Lunch consisted of leftover croissant sandwiches, chips, and veggies. I think we MIGHT have bought a few too many.  Oh well, it is helping out with week one of no spend month.

Very near being burned at the stake, we had MORE leftover sandwiches for supper.  Last time, I promise!

The only gas I had to burn today was to go to a monthly training meeting for my personal business.  Since the gym is on the way home, I went by there so that they wouldn't forget my name.

Side note: I think I am going to quickly grow frustrated with how fast we burn through a gallon of milk around here...probably going to have to pick up another gallon tomorrow or Thursday.

Day 4: Found out hubby didn't fill the tank up before we started our adventure.  He had to drop $20 into his gas tank.  Looks like I'm "winning" for now.

Kids had toast with homemade jelly for breakfast.  I just grabbed a cup of coffee.

Lunch consisted of a box of organic mac n cheese shaped like bugs.  Had it lurking in the back of the pantry.  Ironically the organic mac n cheese is cheaper overall and per ounce than the blue box.

To avoid murder, I prepared chicken tortellini from supplies we had on hand.

I had to run into town for a business meeting, but had a friend headed the same place.  I just met her up the street and we rode together to the meeting as well as to the gym.

Day 5:  Still trying to be as on top of things as possible.  It has been kind of a rough day, so it is a little tough to be excited about sticking to the plan.

Breakfast for the kids was the last of the cereal.  I had....wait for it...coffee!

For lunch, we had cheese and crackers and apple slices.

Supper consisted of barbeque pork chops, whole kernel corn, and butterbeans...all of which we had stored up in the freezer.

Hubby had to stop on the way home to pick up more milk, so we took another $4.28 hit and are now  down to $41.72 for the week and 321.72 for the month.

Day 6: Still feeling pretty good about the no spending concept overall, but definitely ready for a weekend.

Breakfast was cheesy scrambled eggs for everyone.

Lunch was a box of jambalaya rice we had stored in the pantry.  My kids LOVE jambalaya without meat in it, so this was actually a nice treat for them.

For supper, we had leftover pork chops and veggies from the day before.

After supper, I had to run a few business related errands....my gas tank is in tears, but I got a lot accomplished.

Stopped by the store for bread, cereal, dry pinto beans, chicken, and refried beans.  Ended up spending $9.34 total.  That would have left us with $32.38 for the week, but hubby's group did their employee of the month event today, which set him back a whopping $20.  Still, we have 12.38 left!

Day 7: Feeling tired.  Glad it is the weekend for sure.

Breakfast was cereal.  After breakfast, the boys headed to work on vehicles while the girls hit the soccer fields.

Had to stop at the dollar store for a small pack of pullups.  They set us back $8.29, leaving us with a whole entire $4.09 left in our weekly budget!

Lunch consisted of cheese, crackers, and veggies.

For supper, we went over to my inlaws for catfish, potato salad, okra, and hushpuppies...mmmm...good food and good company.

WE SURVIVED OUR FIRST WEEK! 

Not only did we survive, but we had $4.09 left in the budget despite hubby's rule breaking!  That gets me all pumped up and ready to go for another week.

Next week's budget is 25% of the monthly budget, which is $87.50.  I considered rolling the $4.09 into the next week, but I think I'll hang onto it in case we need it at the end.  I would hate to get the urge to splurge. 

I cant wait to share our next update with you.  Hopefully the next time I post, we'll still be on track!