Monday, September 17, 2012

Casual Party Menu for Fall w/ Printable Menu Cards

Fall is upon us!  Finally!  As the holiday season approaches, we have more and more small, casual gatherings in our homes.  This past weekend I had some girls over for some fun and retail therapy (of the yummy smelling variety).  I just thought I would share with you the menu I threw together.  I kept it super simple this go around.  After our huge birthday shindig last weekend, I wanted this to be a low key event.  Two items are old go-to favorites that I use often.  Two are brand new to our home. 


The Menu: 
Our Favorite Rotel Dip served with Tostitos scoops
Ham and Cheese sliders (yes, again...these get requested over and over by friends)
Caramel Cream Cheese Dip served with apple slices and graham cracker squares
Cheaper Than Therapy Cake (because chocolate is cheaper than therapy)

The Recipes: (get the printable version here)

Our Favorite Rotel Dip

1 lb bulk mild breakfast sausage, browned
2 pkg cream cheese
1 can Rotel tomatoes
1 can whole kernel corn


Brown your breakfast sausage.  Drain.  While still warm, add the other three ingredients and mix well.  Serve slightly warm or at room temperature with tortilla chips.

This is a HUGE hit at our house.  I always get rave reviews...the best part is how utterly simple this is to make.  This is easily doubled for larger crowds....trust me...it goes fast.  10 ladies can easily consume a double recipe over the course of an evening.


Ham and Cheese Sliders
24 Sweet Hawaiian Rolls
1/2 butter, melted
24 slices deli ham
1/2 tsp. Worcestershire sauce
24 small slices white American cheese
1 Tbsp. prepared yellow mustard
1/4 c. mayonnaise
1 Tbsp. poppy seeds
1/4 c. miracle whip

Mix Miracle Whip and Mayonnaise together. Spread onto centers of Hawaiian rolls. Layer a slice of cheese and a slice of ham onto each roll. Place dressed rolls close together on a large baking pan. Mix together all topping ingredients and drizzle the mixture over the tops of the sliders. Let the sliders stand on the counter for 5-10 minutes or until the butter in the topping starts to set up slightly. Cover with foil and bake for 12-14 minutes at 350. Remove foil and cook for another couple of minutes, just until tops begin to brown. Serve while still warm.

You can prep these ahead as long as you cover them in the fridge overnight.  Everyone loves when these are served.  Try to pull these from the oven as close to party start time as possible.  They are best when they are still warm and ooey gooey.

I also threw together some little veggie/ranch cups. Just threw in two celery sticks, two carrots, and a squirt of ranch.  Easy peasy.


Caramel Cream Cheese Dip

1 pkg cream cheese
1/2 tub Cool Whip
1c. dark brown sugar
1 tsp. vanilla
toffee bits for garnish

Mix first four ingredients well.  Top with toffee bits and serve with fruit and graham crackers.

Fall has me longing for caramel apple EVERYTHING!  This is the perfect thing to satisfy that craving.


Cheaper Than Therapy Cake (aka...my ambitious recipe for the week)

2 sticks butter plus 2 Tbsp butter, softened

8 oz sour cream
3 c sugar
6 eggs
1 tsp pure vanilla extract
2 1/4 c cake flour
1 tsp baking powder
6 oz. semisweet chocolate, morselfs or finely chopped
3/4 c. cocoa powder, plus some to dust pan with

Preheat the oven to 325 degrees F. Grease and cocoa dust a 10-inch Bundt pan.

Cream together the butter, sour cream, and sugar in a mixer. Add the eggs, 2 at a time, beating well after each addition. Add the vanilla.
In another bowl, stir together the flour, baking powder, and cocoa. Add 1/2 the flour mixture to the creamed mixture, beat well, add the remaining 1/2 flour mixture, and continue to beat at medium speed for 2 minutes. Add chocolate last, mixing well.  Pour the batter into the prepared pan and bake for 1 hour 15 minutes. Continue to bake for an additional 15 minutes if necessary, but do not open the oven to check the cake for at least 1 hour.  In my oven, I almost always need the extra 15 minutes...especially when I use my stonewear pan.

Allow the cake to cool in the pan for 10 minutes before attempting to dump to prevent it from tearing and sticking to the edges.  Then continue to cool the cake.  While you are waiting, you can prepare the topping.

6 oz. semisweet chocolate, morsels or finely chopped
2 Tblsp. butter
1/2 c. heavy cream

Put chocolate and butter into a heatproof mixing bowl.  In a small pot or saucepan, bring the cream just to the point of boiling...then pour it quickly over the chocolate and butter, stirring until the mixture is smooth and creamy.

Pour this mixture over a mostly cool, not thoroughly cool, cake. If you want, you can add some semisweet morsels to the top for extra chocolate...if you don't have enough chocolate yet!


  This all makes for a great casual fall gathering.  I hope you enjoy these recipes and are able to use them with your family and friends.   Did you use any of these recipes?  Have any other great fall recipes you want to share?  Let me know!   Miss the printable?  Get it here.  


Friday, September 14, 2012

DIY: Adorable No Sew Window Valances

I think we all have those projects that we intend to do, but slip further and further down the timeline.  For me, one of those projects has been the window treatments in the girls' room...which started as just my 7 year old's room over three years ago.  I bought the curtain rods when we were building the house and have been trying to decide what to do in there ever since.

Finally, while browsing the other day, I saw pictures on several blogs and sites of these cute valances and thought, "I could do that!"  I got on a huge sewing kick a while back and have a TON fabric sitting around the house for when I pick it back up again.  That is kind of what I do with hobbies.  I pick them up and set them down and sort of rotate around to the different hobbies as I get bored with them.  ANYWAY...enough about that...I had this fabric that I got at Walmart on clearance when the fabric section down-sized for $1 per yard.  It has two tones of lavendar flowers on a white background.  My girls' room is Sherwin Williams Meander Blue and is accented with lavendar and lime bedding and decor.  One day I will get around to showing you the whole room....but not today.

What you will need:
1 curtain rod per window
1 yard white fabric per window
1 yard printed fabric per window
Scissors


I just used a quilting grade cotton fabric for my window valances.  I think they turned out great.  If you wanted to make sure that there was less fraying, you could always buy a heavier fabric.  Drapery grade fabrics would probably work well, but would cost you considerably more.  You can also do this all in printed or all in a solid fabric.  I just listed the two different ones because that is what I used.

(in all honesty though...I couldn't find my white fabric, so I used white pillowcases leftover from pillowcase dress liners)

Ok, so now that you have your supplies gathered, here is what you do:

Begin by laying out your fabric.  I folded mine in half so that I would have less cutting to do and be able to comfortably do the project sitting on the floor of the living room rather than at a table.  I am pretty much a floor dweller.


Cut your fabric into strips 1 1/2-2" wide by 30" long.  This will result in valances which hang around 14-15 inches long.  Of course, you can adjust this to whatever length you choose for your windows.  Just figure that however long your cut your strips, your valance will hang a little less than half the length.


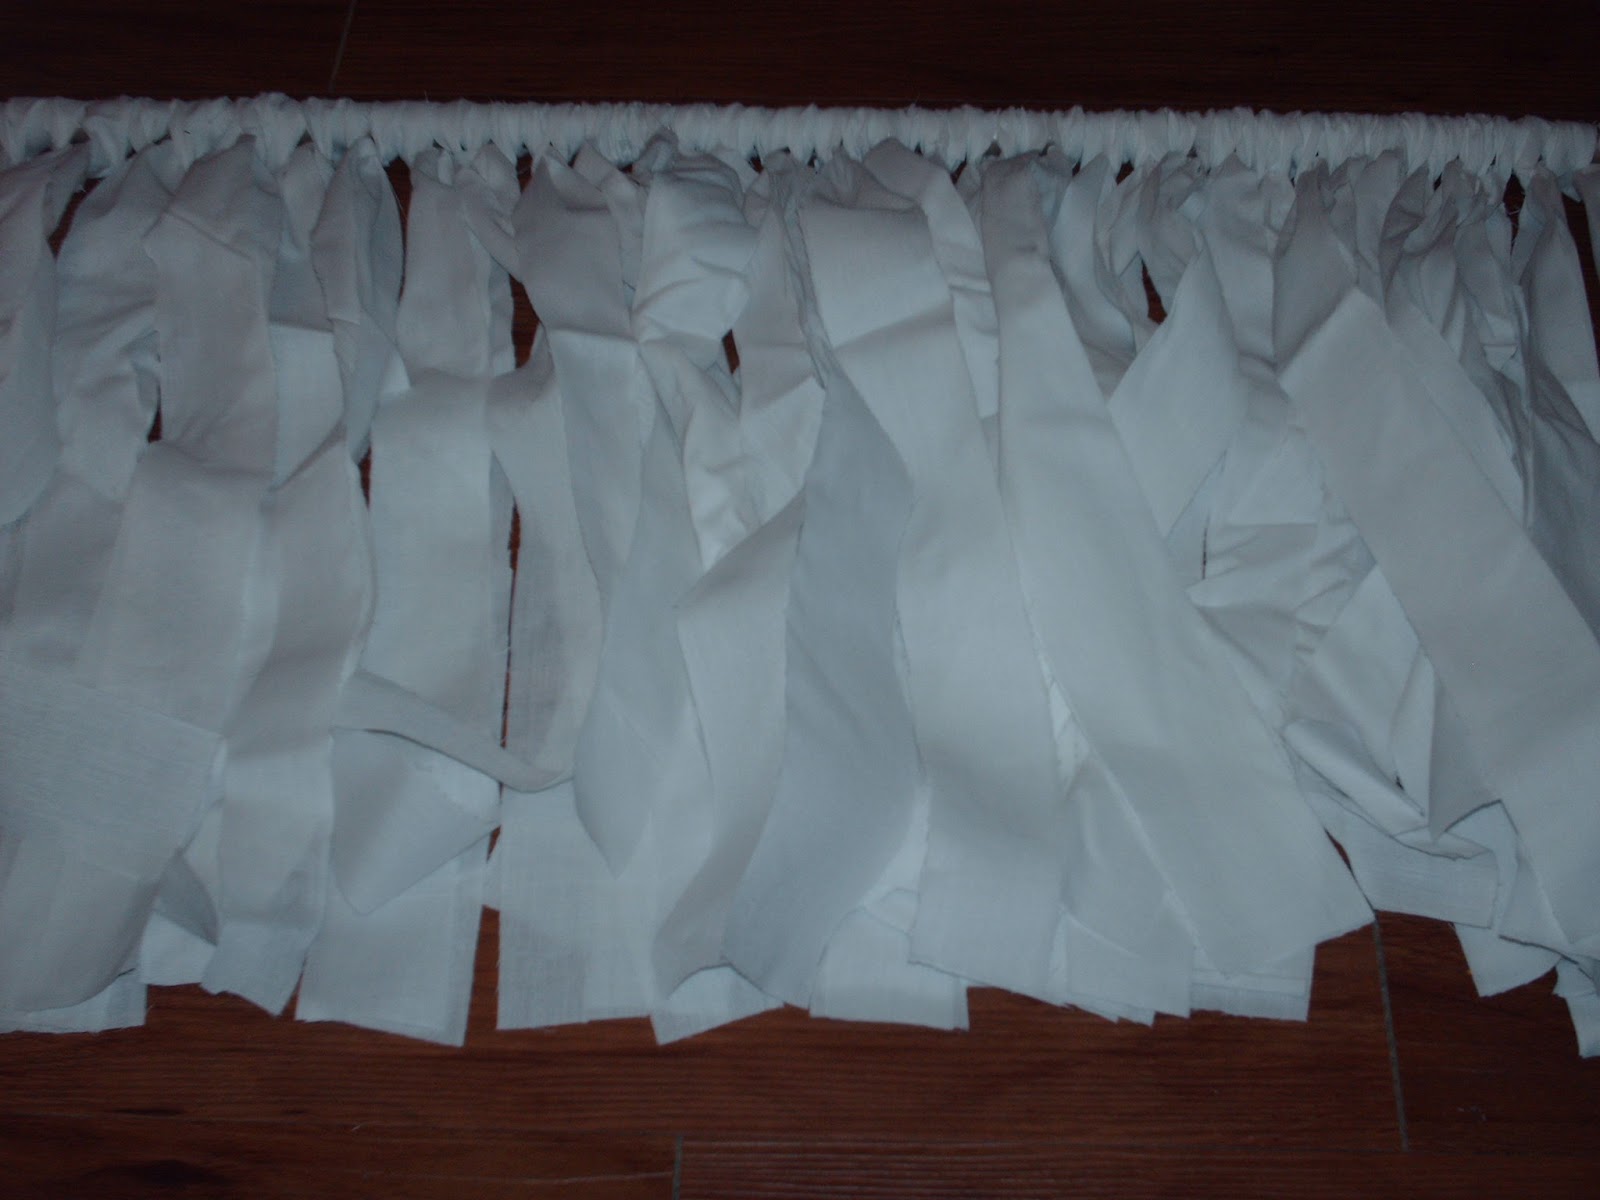
Once you have cut all of your fabric strips, you will begin with your white strips.  Make a loop with the center of the strip, put the loop behind the curtain rod, then slip the loose ends up through the loop and pull taught.  Continue making knots in this fashion until you have tied all of the white strips onto your curtain rod.


Now you will begin with your patterned strips.  Start on the outside of the first white knot.  Tie a purple strip between each and every white knot, letting the fabric overlap.  Continue until you have tied all of the patterned strips onto the rod over the white strips.


Now, if you haven't already installed the curtain rod hooks, you are going to need to do that.  If you have, then you are ready to hang up your creation.  Hang the rods in the rod hooks and adjust the knots on the rod to fit your taste.


Tada!  Great job.  Sit back and admire your awesome work!


Did you do this project at your house?  Do you have another idea for no sew curtains?  Tell me about it in the comments.  I would love to hear from you!

Thursday, September 13, 2012

DIY Better Than Name Brand Furniture Duster/Polish

So, as y'all have seen, I have been on a really big DIY cleaning product kick lately.  I have all sorts of cleaners that I have made on my own, but when I was dusting the house a couple of weeks ago, it occured to me that I have never thought about making my own furniture dusting solution.  It needed to be something that would actually clean and cut through all of the animal cracker guts....yup....I admitted it...toddlers tend to do those things....but it also needed to be something that would leave a nice shine.

I did some online research, then started playing with my formula.  I finally got the measurements to what works for me.  I poured it up into a spray bottle and started spraying.  I didn't like that at all. I know this is picky sounding, but I just really needed my dusting spray to come out in a fine mist like the aerosol cans.  What to do, what to do?  Meanwhile, I got distracted looking through a Pampered Chef book for a friend of mine.  Then, what did my eyes see but their cooking oil spritzer!  I just knew it would be perfect for this project.  So, I ordered the spritzer from my friend and waited (maybe not SO patiently) for it to arrive.  I was so excited when my order came in!

So now that I have everything I need...I can share it with you!

Here's what you need:
1/2 c. olive oil
4 Tbsp. lemon juice (I have mine frozen in cubes in the freezer from fresh lemons)
an awesome PC oil spritzer (or a spray bottle)

I use these small measurements because it is all I need to dust all of the furniture in the house and then some.  If you make more or don't use it all, I highly recommend storing in the fridge because of the fruit juice.

So, all you do is mix together the oil and lemon juice in the spritzer, place the lid on, and shake it like a salt shaker (love all the old song shaking references).  Then apply to wooden surfaces and wipe clean.  The acidic lemon juice will cut through any grease (and animal cracker guts) on your surfaces, and the olive oil will coat and protect the surfaces while giving them that glossy brand new shine.

This, to me, works better than the name brand spray I was using.  It definitely get the animal cracker guts up better....not that anyone else has that problem.  ;o)

I dust with terry cloth shop rags or old washrags.  I find that the microfiber clothes, end up leaving scratches on your surfaces if they get any debri under them (sawdust one week after we move into the house turned into scratched entertainment center built-in).  The terry cloth tends to wick the debri away better...or to me anyway.

Did you make this to try at your house?  Let me know how it did for you!  Have another recipe you use? Feel free to share.  I love to hear from you.

Wednesday, September 12, 2012

Dr. Seuss Birthday Party w/ Free Printables

As most of you know by now, my two youngest children are one year and 18 days apart.  Throwing two birthday parties within weeks of each other would be way too much stress and expense for our family, so we planned on throwing one party for both kids.  Now just to pick a theme that would work for both kids.  Since we would be having a party for one boy and one girl, the theme had to be something gender neutral.  With our munchkins, thing 1 and thing 2 seemed like the perfect fit.

Now that I had a theme, I had to get busy doing research....pinterest...google....you name it.  Slowly, I started forming ideas for the party.  I'm going to start out with an overal spread of the party...then break it down into seperate ideas/projects for you.  So many of the places I looked had pictures, but no instructions...sigh...so frustrating.  I don't want y'all to go through that.

Here is a look at the party...


Now let's break it down...

The food was planned to fit the Dr. Seuss theme:
Green Eggs & Ham (green filled devilled eggs; ham and cheese sliders) recipes here!
Truffula Trunks (pretzel sticks)
Three Cheese Trees (literally three stacks of cheese looking like Christmas trees)
Hop on Pop-Corn (popcorn, duh)
Cat's Hat Cabobs (strawberry and marshmallow kabobs)
Pink Ink Yink Drink (pink lemonade)
Fish in a Bowl (literally swedish fish...in a bowl)
Thing 1 & Thing 2 Cupcakes
Icecream...no awesome name...icecream is awesome enough


Green Devilled Eggs

Ham Sliders

Truffula Trunks
Cheese Trees

Cat's Hat Kabobs

Hop on Pop Corn

Fish in a Pot

Pink Ink Yink Drink
Had to slip in a picture of Silas Sneaking Snacks


The food table projects and decorations:

I took clear forks (I have a huge box from Sam's Club) and wrapped them in red with white dots napkins I picked up at Target.  Then I added a piece of turquoise curling ribbon held together with a glue dot and topped with a circle punch out Seuss picture from my free printables here.


I also printed out the food cards from the same document and placed them in some place card holders that I already had around the house.


For the truffula trees in the truffula tree trunk dish I actually just picked up some twisted neon colored pipe cleaners from the kids craft section of Walmart and a few foofy hair clips from the crafts section.  I twisted a couple of the pipe cleaners together and clipped the hair clips on the top, then just stuck them into the pretzel sticks once I dumped them.

The appetizer picks used to pick up the cheese were actually not DIY...I picked them up from the wedding/party aisle at Walmart.

I printed out water bottle wraps from wanessacarolinacreations.blogspot.com and taped them onto the water bottles.  They fit PERFECTLY on Sam's Club water bottles.

Projects for the treats and sweets Table:


I made these tissue paper poms earlier last week.  The tutorial can be found on last Wednesday's post here.

These were originally intended to hang from the ceiling...but we couldn't get them to stay hanging, so they found their home resting on the sweets and treats table.

I also made this really cute popcorn cone holder.

I bought a piece of florists foam in block form (green...from the floral crafts section).  It was actually cheaper to buy the florist foam than it was to have bought a white styrofoam block.  The florist foam is also a better texture for this project.

I wrapped it in red wrapping paper and but a strip of turquoise ribbon around that.

I then took 24 Wilton lollypop sticks and stuck into the block in a grid pattern....you could also do this randomly...it would be just as cute.

Once I did that, I cut out wedge shapes from scrapbook paper.  (I fit 4 wedge shapes onto a 12x12 sheet of scrapbook paper)  Then I wrapped the wedges into cones and secured them with staples, leaving a hole at the bottom just big enough to fit onto the lollypop sticks.

I stuck the cones down onto the sticks and then filled them with popcorn.  This worked out great, because I made plenty of extra cones.  When people slid the cones off of the sticks, I could easily replace the cone and fill with more popcorn.

The table covering was super simple.  I just took a red table cloth and draped it with half of a turquoise table cloth. 

The cupcakes were made my my husband's cousin. She has been doing cakes for our kids' parties for two years now.  She is fabulous.  She made us come confetti cupcakes with blue icing nestled in red cups so that they resembled thing 1 and thing 2.  I used some more of the thing 1 and thing 2 punchouts from my printables on the fronts of the cupcakes to dress them up a bit.

I put the favors on the sweets and treats table every year.  This year I wanted to stay away from any massive quantities of candy or noisy toys.  I actually picked up some Seuss books and printed out bookmarks, also from wanessacarolinacreations.blogspot.com. I just popped the bookmarks into the books...boom...favors.  These were actually a hit.

Photo Booth Project:

I wanted to give my guests a way to have fun while getting pictures of the guests that were fun and cute.  I hate getting caught in those awkward room scan pictures.  This is way more fun.

I picked up a red and white striped shower curtain from Target and some feather boas from Michael's. I added a penant banner (print and make your own here).  Then I grabbed a turquoise milk crate (Dollar Store, already had for toy storage in my daughter's room), a couple of Seussical stuffed animals, and a borrowed Thing afro cap.  I threw the feather boas and other props into a the crate.  I also grabbed a photo frame at Target and some turquoise spray paint from Walmart.  I spray painted the frame turquoise and saved the mat for guests to sign with a Sharpie.  Later, I will put a pic of the kids inside the frame. 

Here is what the backdrop looked like.


And here are a few of the pictures of guests having fun playing with the props.  I only included adults here, but some of the kid pics were adorable too.


The gift table was just a card table tucked into the corner with the same table dressing as the sweets and treats table.


I also threw a birthday banner onto the wall behind where the babies were set up to demolish their smash cakes.  You can print your own here.

Overall, I was super excited about how things turned out.  We had a blast with family and friends that day.  Now sit back and enjoy a couple of pics of the kiddos.


Hope you enjoyed it as much as we did!  If you decide to use any of these ideas for your party, let me know about it!  I love to hear from you!

Tuesday, September 11, 2012

DIY Bath Crayons from Bar Soap

My kids LOVE bath time.  I mean to the point that some days they end up with two baths!  This, of course, is fine with me.  I want to keep them as interested in bath time as possible.

I was poking around the internet a while back and saw where a mom had put a bar of Ivory soap in the microwave and made it puff up!  How cool is that?  She had done several different things with it, including forming it back into cookie cutters to make soaps.  Pretty cool.  I moved on and didn't give the site another thought really.  Can't even remember where it was.

So last time we were in wally world, we were perusing the aisles and came across bath crayons.  Those suckers are like $10!!  I wasn't willing to spend that much on something that would most likely wind up in the drain or used up after one bath time.  My oldest metioned a few days later that she really would like bath crayons.  Sigh.  Can't I make the kids happy and still not break the bank?

It got my wheels cranking and my mind went back to the post I had read weeks earlier.  Two problems....I didn't have any Ivory soap....and I wanted/needed crayons instead of cut out shapes.  Gonna try it anyway? You know it.

Here is what you need:
One bar of Dove soap (the person who inspired this used Ivory)
a microwave
4 Neon gel food colors (yes, this temporarily dies your child...it washed off when we got to the scrubbing part)
small bowls

Here is what ya do:

Pop the soap into the microwave on a paper towel for between 30 seconds and one minute. Until it EXPLODES....ok, so it doesn't really explode....but it puffs up like a giant cloud....you'll see.  When I took mine out, it flattened out, like this.


On the site I was reading on a few weeks ago, hers stayed nice and fluffy.  I am assuming that is because I used Dove and she used Ivory.  For this project, it doesn't really matter about how fluffy it gets.

Separate the soap fluff into four (or as many as you want) different small bowls.  Add a nice squeeze of gel food coloring to each one.  Then mix thouroughly.  It is best to do this when the soap is still very warm.  If it cools to much, you end up with a crumbly mess.  I used my hands, which are now bright pink...surprisingly from the purple color, not the pink.  Then form the balls into your desired shape.  Don't get too caught up on these being perfect.  Perfectionism ruins a great project.  Besides, these are just for the kids to enjoy...let them be fun, not tedious.

Throw these in the tub with the kiddos, and let the fun begin!


About halfway through this part, I suddenly got concerned that I wouldn't be able to get the colors off the tub.  Bad time to think about that, huh?  It actually came right off with warm water.  Phew!

Did you try this at your house?  How did it go?  Do you have another idea?  Let me know in the comments.  I love to hear from you!

Monday, September 10, 2012

Freezer Meals: One Mess, Eleven Meals...No Crockpot!

There are a TON of freezer to crockpot meals floating around.  I even posted about some last week!  While that is nice, not everyone just wants to use their crockpot every day...some people don't like using their crockpot at all!  I personally can't imagine avoiding my crockpot, but to each their own.

At any rate, I have been rifling through my recipe box this week finding recipes that I often freeze and put up for Once a Month Cooking.  I did a huge OAM cooking session before each of my younger children were born.  It worked out great for our family.  I don't know what we would have done without being able to thaw something out and throw it into the oven with little to no prep work.

These have been prepared over and over again in our home and truly are wonderful.  I can't wait for you to try them at your house!


Here is the list of recipes:
Sweet 'n' Tangy Pork Chops (makes 2)
Chicken Manicotti (makes 2)
Shepherd's Pie (makes 2)
For When It's Chili
Cube Steak Sandwiches
Chicken Spaghetti (makes 2)
Meatloaf
Tomato Gravy for Meatloaf

Print out the recipe sheets here.

As you can see, several of the recipes are designed to end up with two meals rather than only one.  This is great to have on hand for extra meals, potlucks, bringing to families for bereavement, etc.  Just make sure that you are using all of the meals within a safe time frame.  See my freezer storage safety chart here.

With last week's crock pot meals, I broke everything down into steps.  I cut veggies first, then meats, etc.  With this type of freezer cooking though, I actually prepare entire meals all at once before moving on to the next meal.

First, you need to review the recipe list, pick out which recipes you want to try, make a list of all ingredients that aren't already in your house, and go shopping!

Once you come back from shopping, decide where you want to start and dig right in!

One mess, eleven meals...what more could you ask for?  I try to clean as I go so that I have less to worry with when I am done.

Did you try any of these recipes?  How did you like them?  Let me know in the comments below.  I would love to hear from you!

Did you miss the printables?  Here they are:
Freezer Cooking Recipes
Freezer Storage Safety

Friday, September 7, 2012

Cleaning Schedule With Free Printable Tools

Welcome to another Fabulous Friday on Cook It, Clean It, Make It Fun!  I have had several inquiries about my cleaning schedule and how I get it all done.  My initial response is that I almost never "get it all done."  Sometimes I would literally die if I had to have people in my house.  With two toddlers in the house...it's gonna happen.  That being said...I HAVE developed a method for doing a little at a time each day so that I don't ever feel like I have to get it all done at once.

I made some cleaning charts that go along with my schedule.  I'll post a pic of the one of mine that is filled out.  Of course, some of you who work outside the home won't need to include a lot of the things on my chart.  That is why I have left the printable versions blank.  Here is a picture of my personal daily chart.

Get your customizable printable here!

Ok, so let me start by going through my every day list, which is on the left hand side of the page and segmented out into Before Breakfast, After Breakfast, After Lunch, Before Dinner, and After Dinner.

Before Breakfast I require myself to do these four things: Devotional, Get Dressed, Make Bed, and Put in a Load of Laundry.  I find that if these four things don't happen, the rest of my day gets derailed.  You may have a different set of things that are important to you in the morning.  These are mine.  You can write in anything you want on your printables as the spaces are empty.  Typically this is my pre-breakfast routine: Get out of bed and immediately make the bed...it is always easier to take time to do this if you do it immediately.  If you need to go to the bathroom first, fine...the key is to do it while the sheets are stil warm.  (this helps with sheet wrinkles too if you are one to worry about that...I am not)  Then I get dressed.  As a stay at home mom, I have to be honest, if I don't get dressed first thing in the morning it'll never happen.  I love my pj's...I don't need to excuse myself to live in them.  Next I head into the bathroom to wash my face and do my morning routine, but on the way out I make sure to grab a load of laundry to throw in.  I don't know about you, but in a house with two adults and three children, I often end up doing at least two loads per day.  If I get behind...more.  Once I have thrown the laundry in, I grab my Bible and devotional book and settle in for at least a 15 minute devotion.  I try to get up early enough in the morning that I can get all of this squared away before I have to wake my oldest up to catch the bus, but more often than not this all happens while she is getting ready for school.

Phew....now I can have my coffee and enjoy breakfast with my babies.  Don't get too comfortable...that after breakfast list is coming.

After Breafast I unload the dishwasher from the night before and begin loading it for the day by throwing in the breakfast dishes.  I typically do one load of dishes per day in the dishwasher.  That load consists of our breakfast, lunch, and supper dishes as well as any pots and pans used preparing meals that day.  After I have finished unloading and putting away the dishes, I move on to an organizing task.  For me, these tasks come from a Declutter Calendar, which you can find here.  I love a lot of the ideas.  Some days I don't end up having to actually do the item on the calendar...because....well....I don't have some of the issues on it...such as piles of stuff in the hallways.  The kiddos are typically watching either Mickey Mouse Club House or Your Baby Can Read while I do this.  Once I am done with the organizing task of the day, I do a learning activity with the kids.  Some days this is really elaborate, planned, and thought out.  More often than not, this is grabbing whatever we have around us and turning it into learning.  We do colors, numbers, letters, whatever I think of when the time comes.  I would love to claim to be one of those really intentional parents with a plan...but I am just not.  Typically I give them some type of snack while we do this.  Usually string cheese or fruit is on the menu.  After our learning activity, we do a 10 minute quick clean.  These are my favorite things.  I get the kids involved as much as possible.  Obviously, my almost one year old doesn't help much....BUT she eventually will, so getting them started early doesn't hurt.  In a 10 minute quick clean, we basically run through the main part of the house like a whirlwind picking up and putting away anything we possibly can within 10 minutes.  For me...it is more important that the kids are just helping than what we actually get accomplished.  If you do this for yourself, great.  If you do this with kids, I urge you to keep it at 10 minutes and make it game or competition like so that they stay interested in helping out.  At this point, we have free time.  If time has gotten away and it is close to lunch time, I let the kids free play while I am preparing lunch.  If we are completely on our game, we have free time to spend together.  Typically this is our lazy around, cuddle time.  While we have a routine, we don't have a timed schedule.  I plan to work on that.  Leah (almost 1) usually either goes down for a nap now if there is considerable time before lunch or she will sometimes nap after lunch.  I just let her nap when she wants for now.

Lunch at our house can be quite an event.  After we are done make our lunch mess, I look outside praying for sunshine.  If there is sunshine, I make it my goal to go outside, soak up some sun, and let them run off some energy.  Leah really just sits with me at this point, but Silas really enjoys running around wild in the yard.  If it is rainy or still wet from rain (like today) I bust out our tent from Discovery Kids...I think it was about $20.  My kids absolutely love that thing.  We completely wore one out and are on our second.  They love climbing in and out of the tunnel.  After about 30 minutes of running wild in the yard or free play inside, I settle them in for reading time.  I cannot begin to tell you how important it is to read to your kids if you don't.  I so value the time my parents and grandparents spent reading to me.  I read between 3 and 5 books depending on how long they are.  Typically this is the time of day Silas (just turned 2) naps.  I always pull for Leah to nap at this time too...it just sometimes doesn't happen that way.  After reading time I finish my weekly chores that are assigned to that day.  We'll go over those in a minute.  Usually by this time I have completely forgotten about the load of laundry in the washer.  That is why I made a point to add it to my list...so I would remember.  Once I get the laundry switched over I do one more 10 minute quick clean sans children...assuming they are still napping.  I'm going to be honest with you.  At this point, if I have free time before Laney (7, second grade) gets off the bus...I SIT....you heard me...I SIT!  On my bum! And do NOTHING!  Typically by the time the bus runs the babies are awake.  When Laney gets off the bus I help her with any homework and then start my before dinner list.

Once I have looked over Laney's homework, she starts her afternoon routine (I'll do this in another post) and I start mine.  I go ahead and sweep and or vacuum.  We have hard floors throughout our house, but I find that the floor really gets cleaner vacuuming.  If I have time, I go ahead and put away laundry from the day...if not that gets pushed back.  When the time comes, I begin prepping dinner or putting the finishing touches on if it is a crockpot meal.  This is about the time the hubby rolls in and feeds up the dog and chickens.  When he comes in I try to make any phone calls that need to be made while I am finishing up supper and he is playing with the kids.  Once he walks in, I am dead to them!  Lol.  These are some daddy loving babies.  Wow, is it dinner time already?!?!  Let's eat!

After dinner, we clear the dishes and add them to the dishwasher.  I run the dishwasher and wash whatever doesn't fit.  After that I give the countertops a good wipe and the whole family does one more 10 minute quick clean before we start baths and bedtime routines.

I didn't realize how much of a whirlwind life is until I typed that out...hrm....if anyone ever tells you that stay at home moms don't do anything, have them come read this post...haha!

So that covers my every day routine.  Now let's get to my weekly schedule.

Monday is for dusting baseboards and furniture.  I run a swiffer duster (stay tuned for DIY tutorial on how to make your own) around the baseboards absolutely every week so that they don't have to opportunity to get gunky.  If yours are starting out gunky, you will have to scrub them first before you settle into a weekly routine.  I dust the furniture with just a rag and dusting stuff (will have a homemade version posted soon as well).  This is a fairly quick day, so I try to squeeze in a monthly task or two on Mondays as well if I get a chance to.

Tuesdays I tackle bathrooms.  I start in with the toilets.  I use the Clorox toilet wand with the pads.  I know that is neither economical nor eco-friendly, but that is what I feel works best for me.  Then I wipe the rim, seat, lid, and outer areas down with a Clorox or Lysol wipe.  Make sure you get the sides where all the dust builds up...your toilet should always look as close to new as possible.  Nothing says I love you like a clean toilet.  After that I move on to tubs/showers.  I make my own bleach cleaner which I use in combination with a sponge or rag and an old toothbrush.  I use the toothbrush around the drain or on any hard spots to clean in the textured bottom of the tub.  I also use my bleach cleaner, a rag, and toothbrush in the sinks.  I use windex on knobs and spouts and clean the mirrors while I'm at it.  Then, once I am sure the bleach cleaner has dried, I use my homemade multi-purpose cleaner on the countertops, making sure to wipe the switchplates down with the damp rag as I work.  Lastly I make sure the floors are clean.  For the two smaller bathrooms, this means getting down with my multi-purpose cleaner or disinfectant and wiping the floor with my rag.  For the master bath, this means mopping with a Swiffer Wet.  About once a month I will go in and steam mop the bathroom floors with my Shark.  Make sure that you are getting often forgotten places when you clean your bathroom...like the top ledge of the tub/shower insert, the cabinet knobs, door handle, ledges underneath body wash and soap bottles, the fan/vent filter cover....etc.  I also water plants on these days.  I have some vines in the kitchen and living room as well as several plants outside.

Wednesday is bedroom cleaning day.  If my seven year old has done her routines properly, this is very minimal in the girls' room...vacuum, wipe window ledges, and just fluff the place up a bit to make it pretty.  In the two year old's room, I have a little more work...nothing too major.  Usually I have to straighten the clothing drawers, pick up scattered toys, etc.  In our room, because I do live with a thing called a husband, I typically have some stray clothes to pick up, some clutter to put away on the dresser tops, and shoes to put back into the closet.  I also will try to get a monthly chore done on these days if the rooms are not too wrecked when I go to clean them.

Thursdays have tratitionally been my grocery days.  Now that I shop only once per month, I use Thursdays to run errands and get any unfinished monthly chores done.

Fridays are kitchen days.  I clean inside the microwave and stove, clean out the fridge, clear the kitchen counter of any clutter, wipe down appliances, etc.  If I have time I try to add in a monthly kitchen task per week, such as wiping down cabinets, deep cleaning fridge, deep cleaning freezer, etc.

Saturdays are for outside chores.  Any planting, porch sweeping or other outside tasks get done when there are two adults around to laso the kiddos.

Sundays after church and lunch, I try to sit down and clip and organize any coupons.  Honestly, I haven't done this lately.  I have been busy and the coupons in my area haven't been great.  I do plan to get back with the program though.


You have, by now, heard me talk several times about inserting my monthly tasks.  I'm not going to go into great detail about each of them, but here is the list.

Monthly: Dust blinds and fixtures, Deep clean fridge/freezer, Vacuum under furniture, Clean windows, Wipe down cabinets, Clean door handles, Clean inside stove, Clean porch overhead.
Every 3 Months: Go through house & purge, Take a load to charity, Clean out vehicle
Every 6 Months: Clean and Organize Deep Freeze, Scrub Walls & Touchup Paint, Change Out Family Photos in Frames

That is it!  I promise it sounds like more work that it really is when you get into the routine of it.  If you stick with this, your house is sure to stay fabulous all the time.  It is much easier to do a little bit each day than to try to clean it all at once.

Did you miss the printables?  Get them here.

Have you tried implementing this at your house?  Have questions?  Have a different way to doing things?  Let me know.  I would love to hear from you!