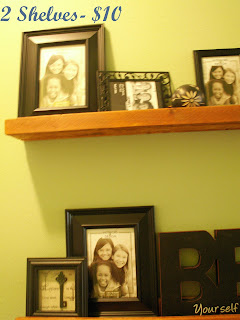
I HATE drilling holes in the walls! I don't hate it because I am making a hole. I hate it because inevitably I end up changing my mind on where something should go or what should hang there. That means I have to fill the hole, paint the hole, and make a new hole. So frustrating!
These easy and affordable photo shelves are the perfect solution. Now I can move frames around on the shelves, change out photos easily, and decorate for the seasons if I want without unnecessary damage to my lovely walls!
What you need:
2- 1"x3"x8' boards
1- 1"x2"x8' board
80-120 grit sanding block
1 1/2" long wood screws
Drill/Screwdriver
Stain or paint of your choice
Liquid Nails or other wood glue
I had the lovely men at my favorite big blue store cut these boards in half for me. If you just want to do the extra work...go ahead and cut these in half.
Tip on selecting boards: Your life will go so much easier if you select a board that is straight and has very little rough to the edges. Otherwise, this whole project may be just a teency bit harder.
The 1x2 was $1.97 and the 1x3s were $2.97. I had the screws, liquid nails, and some stain around the house. That means that I built TWO of these awesome shelves for around $8!
Ok...so here is what you do:
If you didn't have your nice boys in blue do it for you, cut your boards clean in half.
Mark and predrill holes in each of your backboard pieces at 1/4" from the long edge spaced evenly. I used five holes for each backboard. Make sure you have a hole fairly close to each end.
One you have predrilled your holes, line your backboard up with the shelf board making an L shape. Attach the board securely with wood screws. Repeat with the other shelf.
Now attach the 1x2 pieces across the front of the shelf board with liquid nails. This board will not need to support significant weight as it serves as a simple ledge for your shelf. You could substitute a piece of thin decorative molding of your choice, but you will pay more for that option. You should now have a modified U shaped shelf. Let the liquid nails dry and set overnight before you continue. You may want to use clamps to hold the piece in place. I just wedged it against a wall.
Once the liquid nails is dry and your shelf ledge is secure, use your sanding block or sandpaper to sand down all of the rough edges and soften any sharp points. Vacuum or blow away any sanding particles and wipe your project with a barely damp cloth to remove any remaining particles.
Now you are ready to paint or stain your project. I had this stain lying around. I had originally intended to paint these white, but I think this worked out nicely. I couldn't locate our extra white trim paint (shame, shame, I know). Paint or stain your project as desired and let sit to dry for the recommended time (in my case 24 hours) before installing.
It is important to plan out where you want your shelves. You want to make sure that mine were screwed into wall studs so that if you ever decide to put anything heavy on them, you are good to go. Put a piece of tape onto the wall where you want your shelves. Find the studs, marking the tape where they are located. After that simply tape the tape onto the backboard of the shelves to predrill your holes and then screw the shelves to the wall. Don't worry about being able to see these screws...once you have things on the shelves, you won't see them at all.
Now, just throw together the items you want! I picked items all of the same color, but this would also look great with bright, contrasting colors. Laney loved these so much she has requested them in their room. I may be making shelves for their birthday girl collections soon.
Now, get out there and try it!! Let me know if you tried this project at your house. Pictures welcome! I love to hear from you.


Hi Stef!
ReplyDeleteYour shelves turned out great! Stop by Still Woods when you have time!
Thanks! I am working on some more carpentry projects at the moment that I am hoping to post soon. I'll head that way and check it out.
ReplyDelete