Friday, September 28, 2012

A Clean Mess!

Ok, as you read this you are going to wonder what in the world it is doing here on Friday rather than Tuesday....well...we actually did do this on Tuesday...how else was I gonna get the bathrooms clean?  BUT...it did help me to make my house more fabulous....in a way.

My son was being super...um...boy-ish on Tuesday right around the time I got home from errands and got my daughter settled in for a nap.  I really needed to get the bathrooms cleaned, but it just wasn't happening.  Sigh.  What in the world could I do to keep him occupied?

Finally I threw him into the highchair and started rummaging....nope, nah, mmm, no.....SHAVING CREAM!


I squirted shaving cream all over the tray of the high chair and let him just go crazy in it while I cleaned the bathrooms.


He started to get bored part of the way through, so I threw in a rubber ducky for him to "bathe."  He has had enough baths to know how it works.  This was a great role play activity for him as well as a great sensory activity overall.  He had a blast talking to his ducky about taking a bath.  I kept popping my head in asking him had he made sure to wash the ducky's face, tail, etc.  He would promptly scrub whatever duck part I mentioned.


When I got done with the bathroom, I threw him (and his ducky) in the tub, rinsed off the highchair tray and...TADA.....clean everything!  By that time, he was shouting that the ducky was clean and he needed a towel.


Clean Bathroom

Clean Highchair

Clean Toddler

We used daddy's shaving cream and came out smelling like a little man.  If you try this with a girl...definitely use mommy's shaving cream.  This would also be a blast to do and "hide" different treasures in the shaving cream clouds for them to find.  Maybe next time.

Did you do this?  Let me know about it.

Thursday, September 27, 2012

Homemade Chocolate Syrup

I don't know about you, but my kids LOVE chocolate milk.  I don't even know where the love of chocolate milk got started, but it definitely isn't going anywhere.  Powdered chocolate or chocolate syrup can be expensive and contain things that you don't want your kids exposed to.  What to do?

As with most of my projects, this one started out with a problem.  All moms have had this happen at one point or another.  An older child asks for something that you don't have in the house.  A younger child, unable to understand the concept of "we ran out" immediately begins begging endlessly for that item.  The pain never ends until you are able to produce it or sufficiently distract the kids.  This is exactly what happened with chocolate milk at our house.

I knew then that I needed to find a recipe for chocolate syrup that I could whip up quickly in case this ever happened again.  What I came up with has become our favorite chocolate milk mix.

What you need:
1/2 c. cocoa powder
1 c. water
2 c. sugar
1/8 tsp. salt
1/4 tsp. vanilla
glass container for storage


Bring the first three ingredients to a boil in a small saucepan over medium heat.  Boil over medium for 2 minutes.  Remove from heat and stir in salt and vanilla.  Let cool.  Pour into glass jar or container and store in the refrigerator.


This makes a pretty rich mix, so you may want to use as little as 1 Tbsp. of mix per glass.  You'll want to experiment and find the amount that you like the best.


VOILA!  An easy, inexpensive, chemical free way to keep your kids supplied in chocolate milk for a very long time.

Do you use this at your house?  Have a different mix that works for you?  Let me know about it...I would love to hear from you!

Wednesday, September 26, 2012

DVD Organization from Upcycled Kids' Shoeboxes

No matter how much storage we have in our homes, it seems to never be quite enough.  Everywhere I look, there is poorly used space.  One space that has always bothered me is the cabinets in our living room.  I love having storage there, but I feel as if we don't use it well.

Here is what our DVD/VHS storage looked like before.


It took up two drawers.  I just felt like it was a huge waste.

A few weeks ago, my kids got shoes for their birthdays from my mom.  They were precious little converse sneakers.  I hung onto the boxes thinking surely I would be able to use them for something. 

I was pondering how to fix the messy DVD area when I decided, by chance, to see if one of the DVD sleeves would fit into a shoebox.  It DID!  Of course, that set off the whole project.

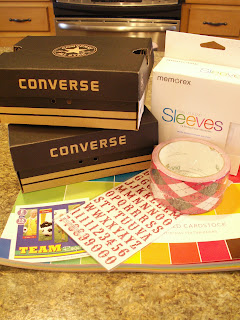
Here is what you need:

One or two child size shoeboxes
Decorative duct tape
DVD sleeves
Scrapbook Paper
Alphabet Stickers


Now that you have what you need, we can get started.

Go ahead and cut the flap top lid off if the lids are not already separate.  If they are, great, you are already a step ahead.

Wrap the decorative duct tape around the box.  I just did this one time because the top portion of the box was already black.  If you want to cover the entire box or if you box isn't as pretty repeat until you get the desired amount of tape on.


Now you will make your alphabetical dividers.

I just used 12x12 scrapbook paper in black and grey.  I cut the paper into 6" x 3" rectangles.  Then I placed a letter sticker at the top of each  card.


You are now ready to start loading your DVDs into the new system.  Just remove the bulky, plastic covers, slip the movies into the sleeves, and place them behind the appropriate letter card.

When you finish filing the movies, it will look like this.


Now just pop the boxes back into your storage area and rearrange the existing drawer.

Ours was condensed to one single drawer from two overflowing ones.

I actually was able to clear half of the third drawer as well by filing all of our Wii Games behind our movies in the same way.


Did you do a project similar to this at your house?  Let me know about it.


Tuesday, September 25, 2012

DIY Bubble Solution

Our church recently held a huge family day for all of the members and their families.  There was a picnic, games, skeet shooting, and all sorts of family fun.  We so enjoyed the fellowship.

When we decided to attend, the first thing I thought was "how am I going to entertain my little kids while all of these other activities are going on?"  A few days later, I sat outside watching Silas and Laney play with some bubble solution someone had given us.  It sparked a thought to bring bubbles for all of the kids to play in.  Now, if you know me, you know I couldn't just go buy a jug of bubble solution and bring to the gathering.  You know that I had to do online research, experimenting, and crafting to be satisfied.

I began researching bubble recipes and experimenting with different formulas.  These instructions take you through making the solution that I finally settled on and that we brought to the gathering as well as a couple of cute crafts to make it extra special.

Here is what you need:

10 oz. Dawn Dish Soap
1 Gallon Water
6 Tbsp Glycerin


OR if you are doing this on a smaller scale, you would need 1 c. Dawn, 3 c. water, and 5-6 drops glycerin

Start with your water in a large container or bucket for mixing.  Add the Dawn SLOWLY and CAREFULLY....the object is not to create too many bubbles when mixing.  Stir in the glycerin SLOWLY, but thouroughly.  Let the mixture sit overnight in the container with NO LID.  This lets the alcohol evaporate out of the Dawn and makes for a better, longer lasting bubble.

I chose to put my bubble formula into a drink dispenser for added cuteness and ease of distribution to the kiddies.


You could always just let the kids use leftover bubble wands, but why do that when you can make something more fun?!?!

Grab some drinking straws and yarn.  Cut lengths of yarn long enough to go through two straws and make a large bubble frame.  Slide two straws onto each piece of yarn.  Tie a knot.  Space the straws out on the yarn to make an open frame.  Dip in your bubble formula and enjoy!

Did you try this?  Do you use a different formula?  Let me know about it!  I love to hear from you!

Monday, September 24, 2012

Put That in a Tin and Bake It! Meals in a Muffin w/ Printable Recipes

While we all love to enjoy a sit down meal around the table, sometimes it is nice to have a grab and go type meal in the plan for nights when we are all rushing around.  Muffin Meals are also FANTASTIC for school or work lunches.  When I do these for my littles, I use Wilton's silicone muffin cups with scalloped edges to look like flowers.  It just dresses them up and makes them fun.  These can also be cooked ahead and popped into the freezer for later.

I threw a few of these recipes onto my first ever once a month shopping menu that was executed long before I started posting here.  Even if you don't make these ahead, they are super easy to throw together.  In fact, most of the time I let Laney (7) make these with only minor assistance (putting them into, pulling them out of the oven).

There are several variations to these online, but these are the ones that work best for us.


Recipe List:

Corndog Muffins
Cheeseburger Muffins
Chicken Pot Pie Muffins
Tamale Muffins
Mini Meatloaves
Pizza Muffins
Heart Attack Muffins (you'll see why, lol)

Get the printable recipe cards here!


Corndog Muffins

Jiffy cornbread muffin mix
1 egg
1/3 c. milk
hot dogs

Mix up your Jiffy Mix as directed. Pour 1/4 c. mix into each regular size muffin tin or less for mini-muffins.  Cut up hot dog into chunks and press into cornbread mix.  Bake according to box directions.


Cheeseburger Muffins

1 lb. ground beef
1 c. grated cheddar cheese
1/2 c. Bisquick Mix
1 Tbsp ketchup
dash worchestershire
1/2 c. milk
2 eggs

Brown ground beef, adding ketchup and worchestershire sauce halfway through browning.  Drain.  Mix in cheese while meat is still very warm.  In a bowl stir together Bisquick mix, milk, and eggs. Pour 1 Tbsp bisquick mixture into each muffin tin.  Then dump about 1/4 c. of meat and cheese mixture into each cup.  Pour 1 more Tbsp bisquick mixture in over meat and cheese.  Bake at 375 for 30 minutes.


Chicken Pot Pie Muffins

2 cans chunked chicken, drained
2 c. frozen mixed veggies
salt and pepper to taste
1/2c. Bisquick Mix
1/2c. milk
2 eggs

Mix chicken, veggies, and desired salt and pepper well.  Stir together bisquick, milk, and eggs.  Pour 1 Tbsp bisquick mixture into each muffin tin.  Put about 1/4c. chicken mixture in each tin.  Pour another 1 Tbsp bisquick mixture over chicken.  Bake at 375 for 30 minutes.


Tamale Muffins

1 1/2 c. corn flour
1/2 c. beef broth
1/3 c. vegetable oil
1 lb. ground beef, browned and drained
1 can rotel tomatoes, drained
1 pkg taco seasoning (or your own blend)
1 tbsp vegetable oil

Mix corn flour, broth, and 1/3 c. vegetable oil well.  Press into muffin tins to make a shell.  Stir together beef, rotel tomatoes, taco seasoning and 1 Tbsp oil.  Place approximately 1/4 c. of meat mixture into each muffin tin.  Bake at 350 for 20 minutes


Mini Meatloaves

1.5 lbs ground beef
1 egg, beaten
1 c. italian breadcrumbs
1 Tbsp Worcesterchire sauce
1/2 c. ketchup
Salt, pepper, garlic powder, onion powder to taste

Mix all ingredients well.  Make 12 balls and nestle them into muffin tin.  Bake at 375 for 20 minutes.  Add more ketchup to the tops (if desired).  Bake another 10 minutes.


Pizza Muffins

3 c Biquick Mix
1 can tomato soup
3/4 c water
1/2 c shredded mozzarella cheese
1/2 c shredded cheddar cheese
1/2 c diced pepperoni
1 teaspoon Italian seasoning

Mix all ingredients well.  Pour about 1/4 cup into each muffin tin.  Bake at 350 for 18-20 minutes


Heart Attack Muffins (can be halved for a smaller crowd)

2 cans corned beef hash
12 eggs
salt and pepper to taste

Divide hash into 12 equal portions.  Press into muffin tins, making a depression in the center.  Crack an egg over each hash tin.  Season with salt and pepper. Bake at 400 for 16-18 minutes or until eggs are cooked to your liking.

Now you see why that is a heart attack in a tin?  So bad for you but so good.

Miss the Printable?  Get it here!


Did you try any of these recipes?  Have anything else you put in a muffin tin?  Let me know about it.

Saturday, September 22, 2012

Giving New Life to an Old Friend: Refinishing an Old Cradle

When I was a baby, my great uncle made two cradles.  One was for my cousin, Kristina.  The other was for me.  As a child, I used the cradle to play mommy to my baby dolls and stuffed animals.  The original cradle was stained a dark, cherry color and sported a detailed Mickey Mouse face on one end.

When my daughter was born, in 2004, my stepfather wanted to do something special for us.  He took the cradle to a man who was to chemically dip and refinish the cradle.  The cradle was disassembled and dipped in the chemical wash.  To our dismay, the cradle didn't come out the way it was intended to.  because it was made from different types of wood and had been stained for so very long, the stain didn't come completely off.  My stepdad was devastated that he had, in his mind, ruined something special to me.  I admit that, at the time, I was disgusted and didn't want to mess with it.  After a while I forgot about the whole thing.

Recently I have been seeing a lot of tutorials about refinishing furniture.  It got me looking around the house for things to refinish.  Then it hit me....the cradle was still at my mom's house.  I could turn a two of a kind piece into a one of a kind piece.  I had my stepdad bring it over and started planning my project.

This is what the cradle looked like after being chemically dipped and before me doing anything to it.


Here is what I used:

4 cans hotel vanilla valspar spray paint in satin
1 can ebony stain by minwax
2 cans spray poly in satin
a damp cloth
an old, clean rag
3 blocks 80 grit sandpaper
2 blocks 130 grit sandpaper


Here is what I did:

I started out sanding the whole thing down with 80 grit sandpaper.  I did mine just until the surface was smooth and the shiny poly was off.  Because I would be staining the whole project dark and then painting and distressing it, I didn't worry about removing absolutely all of the color of the previous stain.


The first stages of the sanding process


After I sanded the entire cradle down, I wiped it down with a damp rag to remove any dust from sanding.  I grabbed a clean, old rag and got busy staining.  I chose to use a dry rag rather than a brush to do my staining.  I just like the look better.  Tip: use gloves...I didn't....my hands were still stained three days later.


Beginning to stain


Staining Completed


DH liked it like this...he was mad that I painted it.  :(

I let the stain cure for 24 hours before doing anything else, like the can instructed.  Once the stain cured, I got to work painting.  For this, you want to spray thinly and evenly.  It may take a few coats before the paint job looks smooth.  Again, don't get too wrapped up in perfection.  If you are going to distress your project, like I did, it is ok if it turns out a little uneven.

Ok...if you are following along....you are going to take your 130 grit sandpaper and start roughing up the edges.  Some may rough up easily...others may take some elbow grease.  Either way, this is going to look amazing when we are done.  I kept going until I felt like I had it distressed enough for me.  Some like to just rough up the edges, others like it to look just really weathered.  I like somewhere in the middle, but a little on the less distressed side is good with me.  Once you have it good and roughed up, you are gonna take your satin poly and just lightly spray all over to seal your work and protect it from any inadvertent distress.


Here is my finished product:


I may end up distressing it further and creating something for the end with the cricut, but for now I think this is perfect for my girls to keep their babies in.

Did you complete a distressing project using these steps?  Do you distress a different way?  Let me know about it.

Friday, September 21, 2012

Tissue Paper Luminary Project

C'mon....you knew I was going to have to make one!  I have seen several versions of these floating around online.  This is my take on the project.

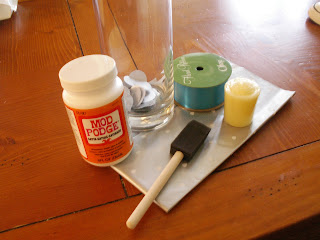
What you will need:
1 tall glass vase, preferrably with straight sides
1 pkg tissue paper, I used silver
1" punch tool
Modge Podge, I used satin finish
short length of ribbon
1 tea light, better to use flameless


Start by using your 1" punch tool to punch out a TON of tissue paper circles.

Make sure your vase is washed and dried thouroughly.

Start with your vase inverted and begin applying your circle punches flush to the bottom rim by painting on a thin layer of modge podge, pressing on a circle, then coating with another thin layer of modge podge.


Work all the way around the vase in a line, overlapping the circles slightly.  Then begin another row, staggering the circles in a brick format.

Continue until you get close to the top rim of the vase, then flip the vase over to complete applying the circles.


Let sit to dry.

Once this step has dried, you may want to paint over one more thin coat of Modge Podge just to secure the project.  Let that dry as well.

I chose to begin laying my circles out flush to the bottom of the vase rather than lapping them onto the bottom.  You may do this or lap them onto the bottom if you choose not to use the ribbon.  If you chose to use the ribbon like I did, you just need to wrap the ribbon around the bottom of the vase snuggly and secure in place with glue.


Now all you need to do is throw a candle into the vase!


Did you try this?  Show me or tell me about it!  I love to hear from you!

Thursday, September 20, 2012

DIY Coupon Binder...Keep Those Savings Organized

I have been keeping a coupon binder for about 18 months now.  I honestly go through spurts where I use it hot and heavy for a while and then taper off for a while.  I must admit that I am not a very dedicated couponer.  However, when I AM using my binder, I save considerable amounts of money.  I have had several inquiries in the past about my coupon binder, so here goes.

What you need:
1- 3 inch ring zip around binder
1 pack baseball card organizers
1 pack organizing tabs (large set....alphabetical or set that goes into the 20's)
sharp scissors
pen
coupons

Notes about supplies: I bought a cute purple zip around binder from CaseIt that has a long carrying strap.  If you plan to carry your coupon binder with you, this is ideal.  I got the alphabetized organizers so that I knew I would have enough tabs.  I bought baseball card organizers in a huge pack so that I would have extras if something happened to the ones I initally used.

Ok.  Now that you have what you need, we can get started.

Go ahead and open up your binder rings and start loading your baseball card organizers.  About every other to every three baseball card sheets, put in a dividing tab.  Continue this until you have all of your tab dividers loaded and a sufficient amount of baseball card organizers.

Now, you will label your index for your divider tabs.  You can customize this in any way you like, but here are the labels for mine:

Air Fresheners/Candles
Baby Items
Baking Needs
Beverages
Breads/Breakfast
Canned Goods
Condiments
Dairy
Dish Washing
Freezer
Grains/Side Items
Laundry
Meat
Medicine/First Aid
Oral Hygiene
Paper Goods/Food Storage
Pasta
Personal Hygiene
Produce
Refrigerated
Snacks/Cookies/Crackers
Soap
Surface Cleaners
Food Misc.
Household Misc.
Restaurants

That list seems to be the easiest for me to keep organized.  This is the third list I have been through...the first two failed miserably.  Just write in pencil and adjust your list as needed.

Once you have your index labeled, you can start adding coupons.  I find that the baseball card organizers are a great size for most coupons.  For coupons that are ridiculously huge, I fold them so that the product name and expiration date are visible.  If I have multiple coupons for the same product or multiple copies of the same coupon, I try to store them in the same pouch to save space.

Once you have your coupons in, it looks something like this.


Obviously turned to the condiments section. Sorry for all of the extra junk in the picture.  This was taken before I knew it would end up on a blog.  Extras in the picture are as follows: top center, my laptop; top right, my daughter's dance dvd; bottom center, my belly which was pregnant at the time with my youngest daughter...lol

If you purchased the CaseIt binder, you have a pocket in the front inside as well as a zipper pocket on the outside.

In my inside pocket, I keep a freebie coupon pouch that my mother in law got me from who knows where.  It is really adorable with pink and white zebra stripes.  I have it divided by store name.  I typically do not carry my entire binder with me.  I typically make a list and put my coupons into my smaller pouch to bring with me.  Some couponers would tell you to carry your entire binder in case there is a sale...I like to avoid the strange looks.

In my outside pocket, I keep a pen and a sharp pair of scissors. This just ensures that everything I need is all in one spot instead of having to go searching for the scissors when I get ready to clip and organize coupons.

Coupon Tips:

I recommend only clipping out coupons on items that you actually normally use.  This keeps me from spending money on something that we may not actually utilize just to say I "saved" money.  Don't fall into the trap of spending to save.

Unless you are just super ambitious and want to compare coupons to sales every week on your own, I recommend linking up with a website where someone has done the hard work for you.  My personal favorite is southernsavers.com.  She seriously does all of the hard work for you.  She matches up the coupons to in store sales and offers.  Also, she often posts special deals and offers.  Most common stores are listed here.  The ones that aren't will be your local mom n pop places.

Don't feel like you have to run around all over town to get the best deal.  Walmart ad matches as do many other stores.  Just save the sale papers from the store that your best deals are at and have them ad match....and then use your coupons on top of that to get the absolute best deal right where you already shop.

DO NOT become a shelf clearer.  The goal of couponing is not to end up on a television show.  It is to save money for your family.  If you absolutely NEED ten or more of an item, give the store a courtesy call so that they can have it ready for you instead of you clearing the shelves.

Don't be shy.  Share and trade your coupons with neighbors, friends, relatives, whomever.  If people around you know you are couponing, they are more than willing to hang onto inserts for you or trade out with you when you have both clipped everything you need.


That's it.  That's my coupon binder.  The most important thing is to periodically set aside time to go through and clear out any coupons that may have expired, moving the ones closest to expiry to the front of each pouch.


Do you have a coupon binder?  Do something different than me?  Want to share your own couponing tips?  Let me know about it!

Wednesday, September 19, 2012

Launchpad: For Those of Us Not Fortunate Enough to Have a Mud Room

Here, in the south, we just don't have mudrooms.  If you are like me, you have been all over the internet drooling all over everyone's cute mudroom ideas.  Well, if your house wasn't built with a mudroom in it, now you can just create a launchpad in its place.

The hardest part of this project was deciding where to put it.  I couldn't put it in the hallway because I was afraid the hooks or the shoe pads would be a hazard.  Mine ended up on the dining room wall.  I omitted a bench for now, but may go back and add one at a later date.  In fact, I may already have just the bench for the job...just will need to refinish it.

Here is what you need:
inexpensive craft frames
inexpensive chalk boards from the craft section or something you have chalk painted yourself
cute little wooden characters or designs
clothespins
double wall hooks
puff paint
tiles or mats
hanging hardware

Notes about supplies:

Frames $2; Chalkboards $1; critters $1; Wall Hooks $3.  All x3=$21.  I already had the tiles, hanging hardware, and puff paint.

You will need enough of all of these items for each station.  I have three children, so I have three of each of these items.


Start with the easiest part of the project.  Select a picture for each child's frame and put it together.  You may choose to paint your frames...I thought these were cute as is.  May change them later.


Then we are going to move on to the chalkboards.  I started by writing each child's initial in puff paint on the chalkboard.  You could leave this off or make it smaller to utilize more of the chalkboard.  You could also write their whole name on the frame of the chalkboard.  Let this dry completely before attempting to do anything else.
Once the puff paint has dried, you will need to get some craft glue or wood glue to affix your wooden character and your clothespin.  I chose to include a clothespin to hold any school papers or notes that needed taken care of.

Let the glue dry.  Meanwhile, you can start out by hanging your hooks.


I hung my hooks just at waist height so that they were easily accessible to the children.  I put the first hook where I wanted the launchpad to start and spaced them 19 inches apart.  This measurement was due to female measuring practices.  I found out later that 16 inches would have been more ideal because that is the standard distance between studs.  Who knew!

Once you have all of your hooks in place, go ahead and put up nails to hang your frames and chalkboards on.  Make sure these are spaced far enough up from the hook to fit your pieces with some space in between.

The chalkboards and frames I bought didn't come with hangers pre-installed, so I grabbed a few tooth hooks from a kit I had laying around and tacked them onto the backs.

Then I was ready to hang all of my pieces.


This is the first completed station of our launchpad.  You can see on the floor what I used the tiles for.  I just used spare tiles we already had in the house.  You can also purchase tiles from a home improvement store for fairly cheap.

Continue this process until you have completed all the desired stations.


There you have it!  Laney, Silas, and Leah all have their own little launch pad!

Make sure that you switch out the pictures periodically to keep them updated to what the child actually looks like.

As I said before, I may go back and add a bench.  I might also go above the picture frames and add some quote or picture.  For now, though, this launch pad is perfect for our family.  Just the right spot for daily items that you just don't want to put away.

Did you do this at your house?  Do you have another style launch pad that you use?  Let me know about it!


Tuesday, September 18, 2012

Morning and Night Routine Card Flipper w/ Free Printables

Ok, so this is not just for toddlers.  In fact, I use this particular item for my 7 year old....but you could definitely use the customizable cards to make these for your toddlers too.

We were having a lot of trouble with our morning routine and getting things done in a timely manner.  We were also having trouble with getting everything done in the evenings without a fuss.  I felt like I was nagging Laney half to death to no avail....definitely had a few meanie mom moments.  I just kept thinking that there had to be a way to keep her on task without having to keep hounding her verbally. 

We all know how much I love pinterest.  Well, I have a LOT of teacher friends.  they were posting pin after pin about classroom routine charts.  That got me thinking about whether I could create and implement something similar at our house.  So, I got to work.

I started out by creating my cards.  Simple background, description of each routine item. Clip art to match. Then I printed the cards onto cardstock for durability and cut them out.

Print out the Morning Routine Cards I use at our house here.


Print out the Night Routine Cards I use at our house here.


Print out blank cards to customize here.


Once I had the cards printed and cut out, I had to figure out a way to display them.  After a few minutes, I decided on a length of 3/8" black satin ribbon.  I grabbed a glue stick and began matching up the morning and night cards back to back with the ribbon sandwiched in between.  I glued each set of cards as closely as possible on the ribbon.

Once I had all of the cards glued onto the ribbon, I tied a loop in the top of the length of ribbon to hang the cards from.  Then I attached the ribbon to the wall of my daughters' room.

Now, she can easily flip the cards over for morning or evening and follow the steps to know exactly what to do without me hounding her constantly.

This has made a HUGE difference in how smoothly our house runs on school days as well as a huge difference in the response from her when she is asked to do something.  There is never any question about what is supposed to get done and when.

Some of you are probably thinking right now that she never gets a break to do anything fun and we are horrible and too hard on her....right?  Wrong.  If she comes in and gets things done that she needs to do, there is almost always time between certain tasks to have free play time.

Did you use these at your house?  Have a different way to stay on task?  Let me know about it!  I love to hear from you!